
Recurring Events let you automatically create a new calendar event after the previous one has ended. This is useful for follow-ups, recurring tasks, periodic calls, reminders, or any activity that needs to be repeated over time.
Create a recurring event
You can create a recurring event when adding a new event or when editing an existing event that is not already part of a recurring series.
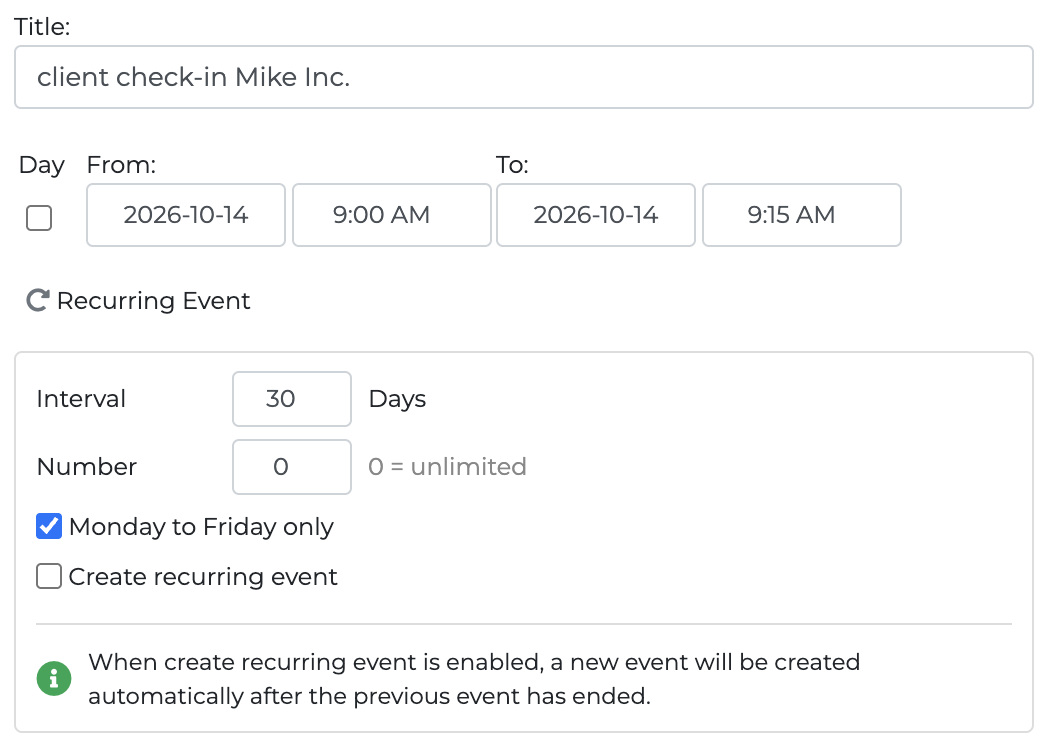
Open the event and click Recurring Event to display the recurring options.
You can then define:
- Interval — the number of days between one event and the next
- Number — the total number of events to create
- Monday to Friday only — prevents recurring events from being scheduled on weekends
Set Number to 0 if you want the recurring series to continue without a predefined limit.
Once create recurring event is enabled, save the event normally. The recurring rule is created together with the event.
How the interval works
The next event is calculated from the start date of the previous event.
For example: Interval: 7 days creates the next event 7 days after the previous one.
An interval of: 1 day, 7 days, 14 days, 30 days can therefore be used for daily, weekly, biweekly, or approximately monthly activities.
Monday to Friday only
If Monday to Friday only is enabled, the system will not create a recurring event on Saturday or Sunday. If the calculated date falls on a weekend, the event is automatically moved forward to the following Monday.
When is the next event created?
Recurring Events do not create all future events in advance.
A new event is created automatically only after the previous event has ended. This usually happens within a few minutes, so a short delay may occasionally occur.
This approach keeps the calendar clean and allows the most recent event in the series to be used as the template for the next one. The event description is not copied to the new recurring event.
Editing recurring events
The recurring rule itself cannot be edited. This prevents a series from changing behavior halfway through, for example from every 15 days to every 10 days.
If you need to change the recurring settings:
- Open any event that belongs to the recurring series
- Open Recurring Event
- Click Stop recurring
- Create a new recurring rule from that event
The selected event will then become the starting point of the new recurring series.
Stop a recurring series
You can stop a recurring series from any event that belongs to it.
Open Recurring Event and click Stop recurring.
Stopping the recurring series does not delete events that have already been created. Only future automatic creation is stopped.
Past events
A new recurring series cannot be created from an event whose start date is already in the past. If a past event already belongs to an active recurring series, you can still view the recurring information and stop the series.
Cancelled events
If the most recent event in a recurring series is cancelled, the system stops generating new events from that series.
Guests and notifications
Recurring events keep the guest and notification settings of the previous event. When a new recurring event is generated, notifications are sent using the same rules as for a manually created calendar event. Company users also receive the event in their calendar when applicable.
Reminders
When applicable, reminders work with recurring events just like they do with individual events. Participants can be notified according to the reminder and notification settings associated with each generated occurrence.
Google/Microsoft Calendar synchronization
Recurring Events created in Onpipeline are managed by Onpipeline itself.
When calendar synchronization with Google Calendar is enabled, each generated occurrence is synchronized to Google Calendar as an individual event, not as part of a native Google recurring series.